I started out by giving each material a base colour and a
0.5 roughness value. I usually work on one material at a time, while leaving
the other ones the default grey value and I’m trying to break this bad habit. When I began texturing I had in mind the art
style of Dishonored 2. However, I couldn’t settle for one, since both 1 and 2
had elements that I loved. For instance, I wanted the skin to look as in the
second game, but I liked the color variation of the clothes in the original
concept. So, I made up my mind – I was not going to worry about the specific
style, but rather make it look good (at least to me).
Firstly, I started refining the skin texture. I noticed that
dishonored characters tend to have way more pronounced skin tone differences on
the different areas of the face. For example, the blue/purple tone under the
eyes is way more pronounced than it would be in a normal person. So, I
gradually built up the skin undertones, the colour variation, the colour of the
pores with a curvature mask, added white spots, blemishes, added in the colour
of the beard and a few black pores to look like small ingrown hairs.
Then I started on the clothing. I added a few colour
variations to the shirt, both hand painted and using the AO and curvature maps.
I generated the roughness with grunge maps and added a few extra layers to get
a more varied result. The apron was fun to paint, since there are quite a lot
of shades of green in the concept. After painting the apron, I added a height
map with black and white stripes. This made the material look a bit shiny, so I
had to bump up the roughness. I did the same to the pants – added colour
variation, hand painted and generated based on the AO and curvature maps, added
roughness, roughness variation and a height map.

At this point I was quite pleased with the upper part of the body, but not so much with the pants and shoes. I needed a more visible hue change, or maybe brighter colours. So I went into Photoshop and tweaked the saturation a bit and added some more variation - some green, red and yellow tints.
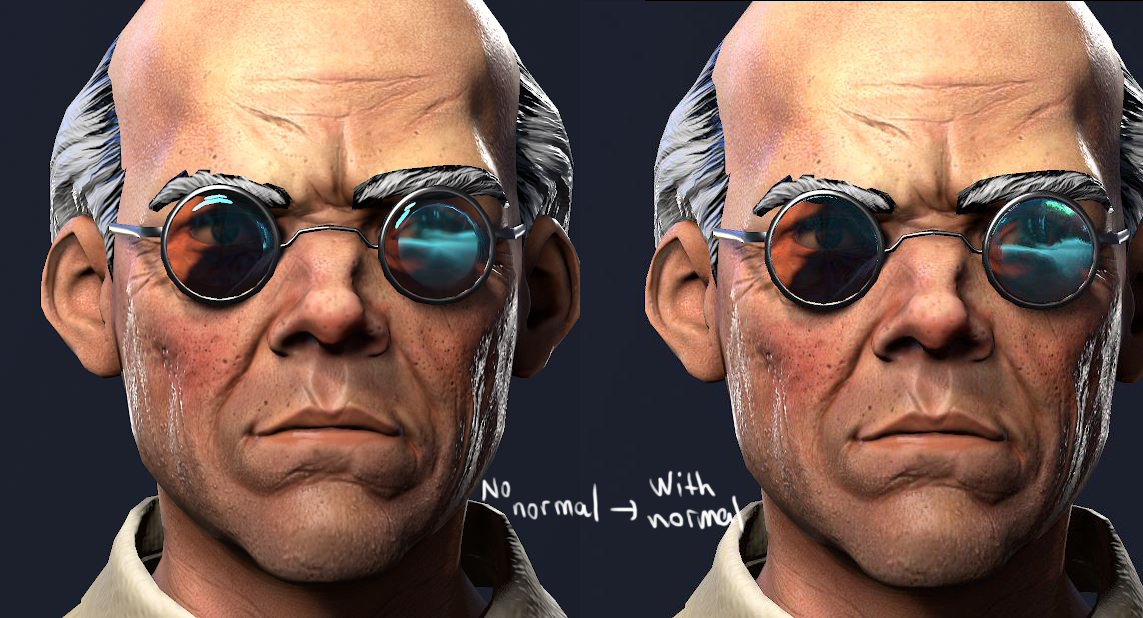
I also made a high poly verion on the lenses and baked the normal map. The issue was not very apparent on the transparent lens material, but here is a before and after for the other one:
 And that's how my material setup for these lenses looks like:

After the textures were finished, I made the scalpel in 3ds max, both the high ald low poly versions. I unwrapped the low poly, then exported everything to Substance Painter. I baked the maps and then applied a basic metallic texture to it. Making the blood look good wasn't easy. I used the stains that come with Subtance painter, but they are quite transparent and they looked more like coffee stains than blood splatters. So I had to pick reference images and make some of my own alphas.
For the plinth I wanted to have some ceramic tiles as in the concept. I made the material quite easily in Substance using a pre existent alpha texture. I added in the albedo channel a mid grey for the base colour and a darker tone in between the tiles. Then, with the same aplha in the mask, I added a 0.2 height value to make them look like actual tiles instead of a flat plane. I set the roughness quite low, and painted in some roughness variation and that was it. I had my plinth.
After I finished texturing the charcter I went on and rigged it in 3ds Max. I brought the model in Max, assigned a multi sub-object material to it, reset the x-normal and brought the pivot point to the origin. Then, I added a biped system and started placing the bones in the correct position. I then started skinning. This time I finally figured uot how to paint weights in Max, and that really sped up the whole process.
Presentation usually takes ma at least one full day of work. I usually need to come up with a bunch of different scenarios and compare them to see which one I like better than the other. Surprisingly, I didn't lose so much time on this one: I placed a main light, a low intensity filler light and a few rim lights and everything worked like charm. I was wery pleased with the result. Last but not least, I baked the thickness map for the skin (I don't usually bake it when I start my project because it's the map that takes the longest time to bake without being so useful in the texturing process) and I edited it into Photoshop a bit, then used it as a mask for the translucency. I set the subsurface scattering to a bright orange color, then I changed my mind and set it to a very saturated version of the albedo. Since I was still in the phase when I try things out and see if they work for me or not, I set the tint of the translucency to a dark red. It made she skin have more of a yellow tint, just like wax.
I rendered the last two GIF images in marmoset as well. Instead of capturing a video, I exported a 300 frame jpeg sequence. Then, I brought all of them into Photoshop using a script and I created a frame animation.


At this point I was quite pleased with the upper part of the body, but not so much with the pants and shoes. I needed a more visible hue change, or maybe brighter colours. So I went into Photoshop and tweaked the saturation a bit and added some more variation - some green, red and yellow tints.
I also made a high poly verion on the lenses and baked the normal map. The issue was not very apparent on the transparent lens material, but here is a before and after for the other one:

After the textures were finished, I made the scalpel in 3ds max, both the high ald low poly versions. I unwrapped the low poly, then exported everything to Substance Painter. I baked the maps and then applied a basic metallic texture to it. Making the blood look good wasn't easy. I used the stains that come with Subtance painter, but they are quite transparent and they looked more like coffee stains than blood splatters. So I had to pick reference images and make some of my own alphas.
For the plinth I wanted to have some ceramic tiles as in the concept. I made the material quite easily in Substance using a pre existent alpha texture. I added in the albedo channel a mid grey for the base colour and a darker tone in between the tiles. Then, with the same aplha in the mask, I added a 0.2 height value to make them look like actual tiles instead of a flat plane. I set the roughness quite low, and painted in some roughness variation and that was it. I had my plinth.
After I finished texturing the charcter I went on and rigged it in 3ds Max. I brought the model in Max, assigned a multi sub-object material to it, reset the x-normal and brought the pivot point to the origin. Then, I added a biped system and started placing the bones in the correct position. I then started skinning. This time I finally figured uot how to paint weights in Max, and that really sped up the whole process.
Presentation usually takes ma at least one full day of work. I usually need to come up with a bunch of different scenarios and compare them to see which one I like better than the other. Surprisingly, I didn't lose so much time on this one: I placed a main light, a low intensity filler light and a few rim lights and everything worked like charm. I was wery pleased with the result. Last but not least, I baked the thickness map for the skin (I don't usually bake it when I start my project because it's the map that takes the longest time to bake without being so useful in the texturing process) and I edited it into Photoshop a bit, then used it as a mask for the translucency. I set the subsurface scattering to a bright orange color, then I changed my mind and set it to a very saturated version of the albedo. Since I was still in the phase when I try things out and see if they work for me or not, I set the tint of the translucency to a dark red. It made she skin have more of a yellow tint, just like wax.
I rendered the last two GIF images in marmoset as well. Instead of capturing a video, I exported a 300 frame jpeg sequence. Then, I brought all of them into Photoshop using a script and I created a frame animation.


No comments:
Post a Comment